
Custom Apparel Guides
How to Design Clothes (Even If You Can't Sew)

Learning how to design clothes starts with one decision: are you designing the garment itself, or the artwork that goes on it? Designing the garment means sketching, pattern making, test samples and sewing. Designing on a ready-made blank means creating artwork, choosing the garment and fabric, picking a decoration method and approving a mockup, and you never need to touch a sewing machine.
This guide covers both routes, then spends most of its time on the second, because that's where most first-time designers, small businesses, teams and new brands begin. It's written from the production side by BizzyStitchn, an Orlando-area decorator that embroiders and prints apparel for people who design their own. So you'll get the practical rules most design guides skip: file types, print sizes, stitch limits, fabric weights and what each choice does to cost.
Two Paths: Cut-and-Sew vs. Decorated Blanks
"Design your own clothes" means two very different things online, and mixing them up is the most expensive mistake a beginner can make. One path creates a new garment from fabric. The other puts your design on a garment that already exists.
Cut-and-sew: designing the garment from scratch
This is what fashion school teaches. You decide the silhouette, seams, fabric and fit, and nothing about the piece exists until you make it. The usual sequence looks like this:
- Sketch the idea over a croquis (a faint, neutral figure template) or as flat technical drawings that show the garment front and back.
- Make a pattern. Either drape fabric on a dress form and transfer the shape to paper, or draft flat patterns from a sloper, a basic block fitted to one set of measurements.
- Sew a toile, also called a muslin, in cheap fabric to test fit and proportion, then correct the pattern. Two or three rounds is normal.
- Write a tech pack if someone else will produce it: flat sketches with measurements, fabric and trim specs, stitch types, a size chart and grading rules for each size.
- Grade, sample and produce, either by sewing each piece yourself or by hiring a cut-and-sew factory.
It's the only way to get a truly original shape, and it's deeply rewarding. It's also slow and front-loaded. Pattern work and sampling cost money before a single sellable piece exists, and factories usually set a minimum order per style and color.
Decorated blanks: designing on a garment that already exists
The second path starts with a finished blank (a tee, hoodie, polo, cap or sweatshirt) and adds your design with embroidery, printing or patches. You control the artwork, placement, garment style, color and fabric, and you skip patterns and sewing entirely. Most merch, team gear, work uniforms, personalized gifts and first clothing-brand drops are made this way.
| Cut-and-sew | Decorated blanks | |
|---|---|---|
| What you design | Silhouette, seams, fit and fabric | Artwork, placement, garment choice and decoration |
| Skills needed | Sketching, pattern making, sewing or a tech pack | Basic graphic design, or a clear idea and a decorator to lay it out |
| Tools | Dress form, pattern paper, rulers, sewing machine, pattern software | A sketchbook or design software |
| Money spent before the first wearable piece | Patterns, toiles, samples and factory minimums | Small one-time setup fees for some methods; none for DTF |
| Minimum quantity | Often set by the factory | None with us: a single piece is fine |
| Best for | Original garment shapes, fashion collections | Merch, uniforms, teams, gifts, a first brand drop |
You don't have to choose forever. Plenty of designers prove an idea on decorated blanks, learn what sells and who buys it, and only then invest in cut-and-sew for their best sellers.
Find Your Idea and Build a Mood Board
Good designs start as a problem, not a picture. "A shirt for our 5K that people still wear in July." "A hoodie the grandkids will fight over." "A cap that makes our crew look like one company." Write that sentence down before you open any software, because every later decision gets checked against it.
Answer four questions first
- Who wears it? Age, size range, and whether they chose the piece or were handed it. A shirt people buy has to win them over; a uniform has to be comfortable for eight hours.
- Where is it worn? An air-conditioned office, a job site, a booth at an outdoor festival in Central Florida humidity. Each points to a different fabric.
- How often is it washed? Weekly-wash uniforms favor embroidery and durable prints over delicate finishes.
- What is it for? Gift, uniform, merch for sale, fundraiser or event keepsake. This sets your budget per piece and how many you need.
Build the board
A mood board is a page of images that captures the feel you're after: colors, type styles, textures, logos you admire, photos of places and objects. Don't fill it only with other clothing, or you'll design something that looks like everything already on the rack. A Pinterest board, a shared folder or an actual corkboard all work. Then boil the board down to three decisions:
- A palette of two to four colors, including the garment color. Fewer colors print and stitch cleaner, and they cost less to screen print.
- One or two typefaces. A display font for the hero word and a plain sans-serif for anything small.
- A placement plan. Left chest plus full back? One big front graphic? A small sleeve hit? Placement is a design choice, not an afterthought.
Stuck on a starting point? Browse our list of clothing design ideas, grouped by occasion and audience.
Keep the artwork yours
Use art you created, commissioned or have written permission to use. Team logos, cartoon characters, band names and other companies' trademarks belong to their owners, even on a single shirt. Stock art and font licenses vary too, so check that yours covers merchandise you plan to sell.
Sketching and Preparing Print-Ready Artwork
Sketch on a flat, not a fashion figure
When you're decorating an existing garment, you don't need a croquis. Print a flat template (a front-and-back outline of a tee, hoodie or cap) and sketch on it at rough scale. You'll see right away whether a 12-inch graphic swamps a youth medium, or whether a left-chest logo is too detailed to read from across a room.
Pick software that fits the job
| Tool type | Examples | Use it for |
|---|---|---|
| Vector editors | Adobe Illustrator, Affinity Designer, Inkscape (free) | Logos, lettering and line art that must scale and stay sharp |
| Raster editors | Adobe Photoshop, Procreate (iPad), GIMP (free) | Photos, painted textures and detailed full-color art |
| Pattern and 3D garment software | CLO 3D, Valentina or Seamly2D (free) | Cut-and-sew patterns and virtual fitting |
None of these are required to get started. A clean pencil sketch, a photo of a napkin drawing or a clear written description is enough for a bulk quote (100+ pieces) or our 3D Custom Designer.
File rules that prevent reprints
- SVG or PDF files are best; high-resolution PNG or JPG files are accepted, and AI and EPS files upload in our 3D Custom Designer too.
- Raster art should be 300 dpi at the actual print size. A 12-inch-wide front print needs an image about 3,600 pixels wide. A 600-pixel logo saved from a website will look soft and jagged at that size.
- Use a transparent background on PNG files, unless the box behind the art is part of the design.
- Outline your text (or send the font file) so the lettering doesn't change on our end.
- Design for ink and thread, not a screen. Monitors glow in RGB, while ink and thread reflect light, so electric blues and neon greens print duller than they look on your phone. If an exact brand color matters, include its Pantone (PMS) number and we'll match it as closely as possible.
Size the art for real garments
Most decorated apparel uses a handful of standard placements. Designing to these sizes from the start saves rework.
| Placement | Typical size | Good for |
|---|---|---|
| Left chest | 3–4 in. wide | Logos and short names on tees, polos and work shirts |
| Full front | 10–12 in. wide | The main graphic on adult tees and hoodies; top about 3 in. below the collar |
| Full back | 10–12 in. wide | Big graphics, event details, sponsor lists, team names |
| Back yoke | Up to about 10 in. wide, 2–4 in. tall | A company name or website just below the collar |
| Sleeve | 2.5–3.5 in. wide | A secondary logo, flag, date or social handle |
| Cap front | About 2–2.25 in. tall, 3–4.5 in. wide | Logos and short words on structured caps |
On a hoodie, the full-front print has to end above the kangaroo pocket, so it's shorter than on a tee. On youth sizes, scale the front art down so it doesn't wrap into the armpits.
Simplify the art for embroidery
Embroidery rebuilds your design in thread, so the rules differ from printing:
- Keep text at least about 1/4 in. tall. Smaller letters fill in and become unreadable.
- Avoid hairline strokes. Lines thinner than about 1 mm don't hold a clean satin stitch.
- Use solid shapes. Gradients, soft shadows and photos don't translate into thread.
- Expect one stitch file per design. Your art is digitized once for a one-time $35 fee, the finished file is yours to download from your account, and reorders of the same design skip the fee.
If the logo is the core of your design, our guide to designing a clothing logo covers the marks that hold up at 3 inches on a chest and 2 inches on a cap.
Picking a Blank Garment and Fabric
The blank is half the design. The same graphic looks and wears differently on a 4.2 oz tri-blend than on a 6.5 oz heavyweight cotton, and a print that's perfect on a cotton tee can look patchy on a performance shirt.
Fabric blends and what they do
| Fabric | Feel and wear | Decorates best with |
|---|---|---|
| 100% ring-spun cotton | Soft and breathable; can shrink slightly in a hot dryer | DTG, screen printing, DTF, embroidery |
| 50/50 cotton-poly | Holds its shape, shrinks less, a little less soft | Screen printing, DTF, embroidery |
| Tri-blend (cotton, poly, rayon) | Very soft and drapey, with a lived-in look | Screen printing (ink looks slightly faded), DTF |
| 100% polyester performance | Light, moisture-wicking and quick-drying | Sublimation on light colors, DTF, embroidery |
| Cotton-poly fleece | Warm and structured | Embroidery, screen printing, DTF |
Weight, in ounces
Garment weight is usually listed in ounces per square yard. For tees, around 4–4.5 oz is lightweight and drapey, 5–6 oz is the classic everyday tee, and 6.5 oz and up gives the boxy, heavyweight feel streetwear brands like. Hoodie fleece runs from roughly 7–8 oz for midweight to 10 oz and up for heavyweight. Heavier fabric also gives embroidery a firmer base, so a dense logo is less likely to pucker.
Fit and sizing
Decide early between unisex, women's and youth cuts, since one design can run across all three. Compare size charts by measurement (chest width laid flat and body length), not by the letter on the tag, because a "large" varies from one blank to the next. Then order one sample in your own size before you commit to a run.
Match the blank to the wearer
For outdoor events in Florida heat, a lightweight polyester or cotton-poly blend beats a heavy cotton tee. For staff who wear the piece every day, a durable blend that survives weekly washing matters more than the softest hand feel. Our fabric and blank guide goes deeper on fibers, weaves and care.
Thread, Ink or Patches: Decorating Custom Clothes
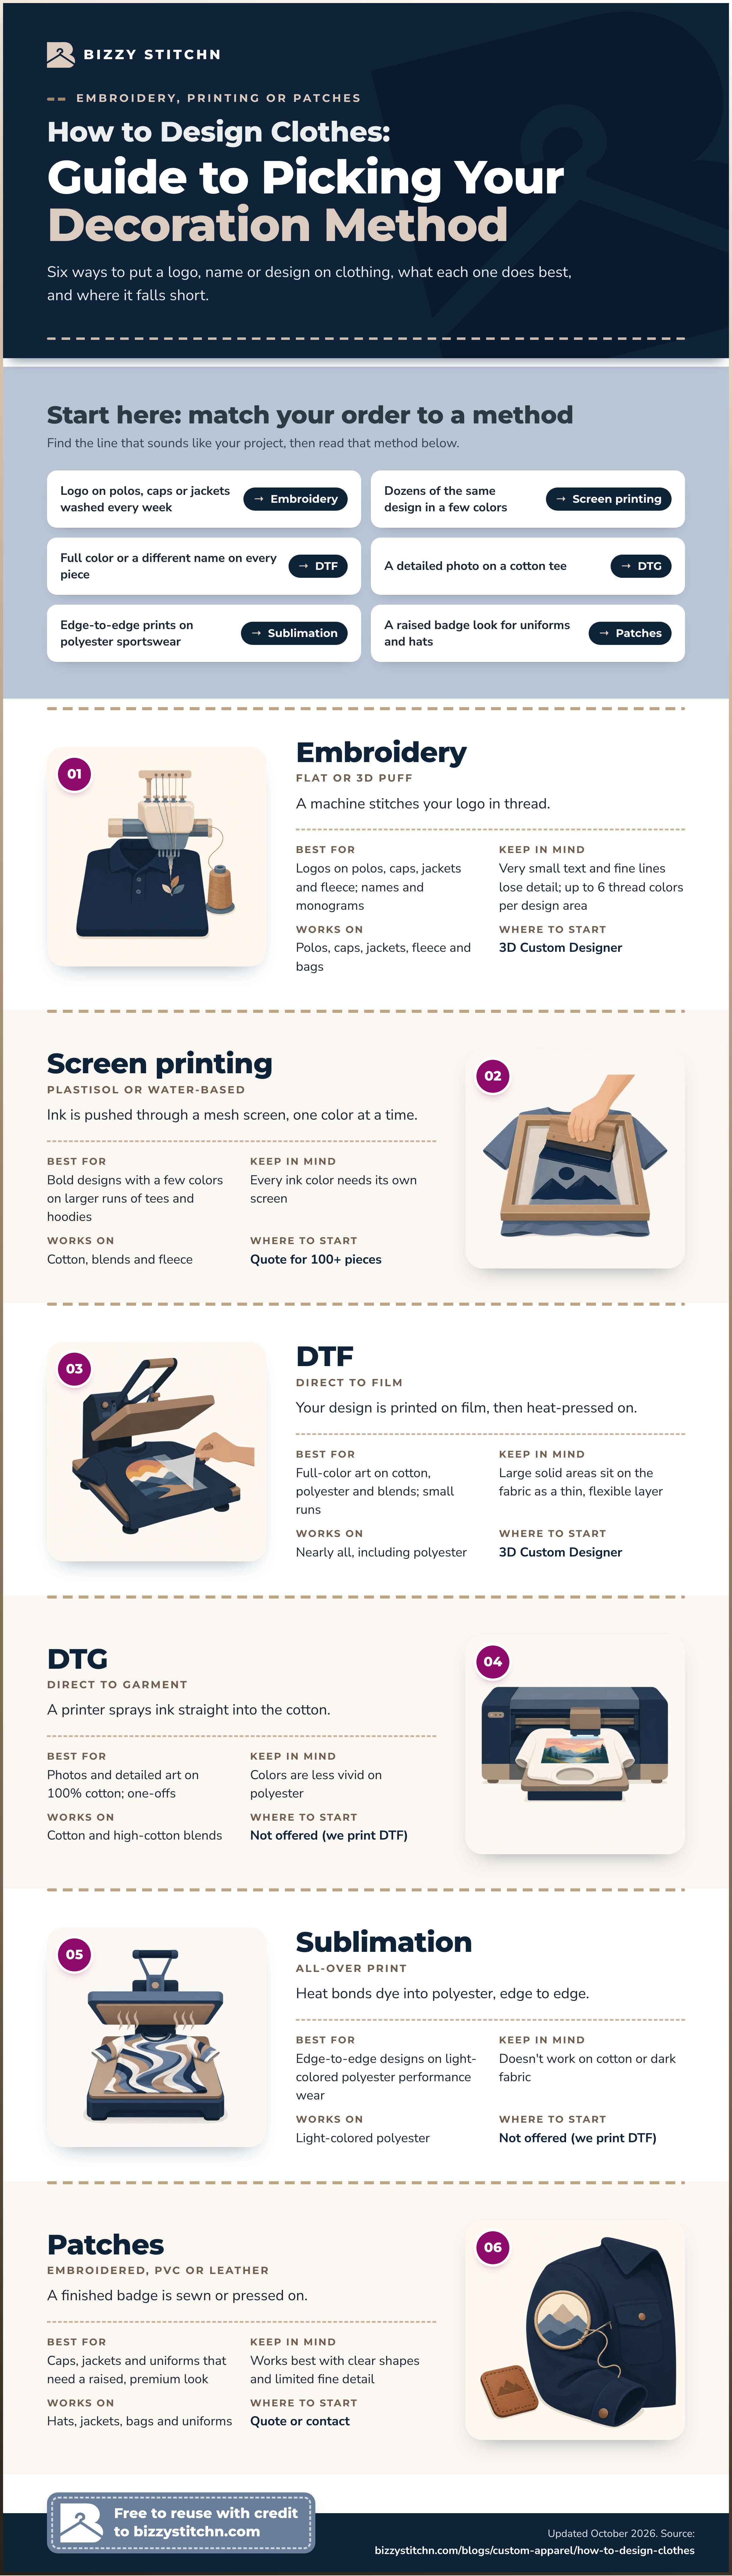
The decoration method shapes how your design looks, how it feels on the body, how long it lasts and how the cost behaves at different quantities. Here's how the six options compare.
| Method | How it works | Art that suits it | Watch for | One-time setup |
|---|---|---|---|---|
| Embroidery | Thread stitched into the fabric from a digitized file | Logos, names and monograms with solid shapes | Fine text and gradients; very thin tees can pucker | $35 digitizing per logo or artwork; names and monograms $10 per item |
| Screen printing | Ink pushed through a mesh screen, one screen per color | Bold art in a few colors, larger runs | Photos; every extra color adds a screen | Quoted with 100+ piece orders |
| DTF (direct to film) | Design printed on film, then heat-pressed onto the garment | Full-color art, small runs, cotton or polyester | Large solid areas feel like a thin layer | None |
| DTG (direct to garment, not offered by us) | Inkjet printing straight into the fabric | Photos and detailed art on 100% cotton | Duller color on polyester | None |
| Sublimation | Dye bonded into polyester fibers with heat | Edge-to-edge designs on light polyester | No cotton, no dark garments | Not offered by us; we print with DTF |
| Patches | Embroidered, PVC or leather patch made separately, then attached | Caps, jackets and uniforms that need a raised look | Very fine detail | Quoted with your order |
Quick rules for choosing
- One piece, or a few, with lots of colors: DTF, since it has no setup fee.
- The same design on 100+ shirts in one to three colors: screen printing through our team, where the per-color setup spreads thin.
- Polos, caps, jackets and anything washed weekly: embroidery for your designs lasts and looks polished.
- Performance tees and all-over prints: sublimation, because the dye becomes part of the fiber and can't crack or peel. We don't sublimate, but we print performance tees with DTF.
- A premium raised look you can reuse across garments: custom patch designs in embroidered, PVC or leather.
- Bold lettering that stands off a cap front: 3D puff embroidery stitches over a foam base for a sculpted look. Keep the shapes thick and simple, because fine detail and small text don't puff well.
One decoration method per garment
Each garment is either embroidered or printed, so choose the method that suits the whole design: embroidery for a premium logo or name, print for large, colorful or photo artwork. For team or family orders, the main design can be printed while each piece gets a personalized name or number printed separately. Our page on printing your clothing designs explains how screen printing, DTF, DTG and sublimation handle different fabrics and quantities.
See It Before You Buy: Try Our 3D Custom Designer
Once you have art and a blank in mind, you can design your own clothes live in our 3D Custom Designer or, for 100+ pieces, request a bulk quote. Either way, you'll see a preview to approve before anything is produced. That's the moment to catch problems, because a typo on a screen costs nothing and a typo on 48 hoodies costs a lot.
What to check on every mockup
- Placement height. Is the front print sitting on the chest, or drifting toward the belly? Is the left-chest logo centered on the chest rather than crowding the collar?
- Size across the order. If the run includes youth smalls and adult 3XLs, check that the art is scaled for both; resizing the same design adds no new setup fee.
- Colors. Thread and ink colors against the actual garment color, especially light ink on heathered or dark fabric.
- Spelling, names, numbers and dates. Read them out loud. Then have someone else read them.
- Every placement. Front, back, sleeve, cap side: make sure nothing you asked for is missing.
- Garment details. Style, color name, cut and the size breakdown.
Order a sample first
Because there's no minimum, the smartest first order is often one piece in your own size. Wear it, wash it twice and see how the fabric, fit and decoration hold up. Then order the run with real confidence.
One note on garments: we decorate the blanks we supply, which lets us match each method to a fabric we know will hold it. Orlando-metro customers can pick up finished orders at our Orlando-area warehouse, and every order can ship anywhere in the US.
What It Costs to Design Your Own Clothes
Designing on paper costs nothing but time. Software can be free (Inkscape, GIMP) or a monthly subscription. The real cost appears when the design becomes a garment.
On the cut-and-sew path, the money goes into pattern making, toile fabric, sample rounds and factory minimums, all before you have stock to sell. On the decorated-blank path, per-item price comes down to five things: the garment, the decoration method, the number of ink colors or stitches, the number of placements and the quantity. Setup fees apply once per design:
- Embroidery: a one-time $35 digitizing fee, with the stitch file downloadable from your account.
- Screen printing: setup is quoted with orders of 100+ pieces, since each color needs its own screen.
- DTF: no setup fee.
Reorders skip both fees, and so does the same design on another garment or size. Garment prices are listed on each product page, so you can see the blank's cost and the setup fees separately. Working to a hard date? Rush orders are available, with the rush fee quoted with your order. Here's how the one-time setup fees spread across different order sizes:
| One-time setup | Total | 1 piece | 12 pieces | 48 pieces |
|---|---|---|---|---|
| Embroidery digitizing ($35) | $35 | $35.00 each | about $2.92 each | about $0.73 each |
| Three-color screen print (100+ pieces only) | Quoted at 100+ | DTF instead | DTF instead | DTF instead |
| DTF | None | None | None | None |
The pattern is clear: for one-offs and tiny runs, DTF usually comes out ahead. Once the same design runs to 100+ pieces, screen printing's setup becomes a rounding error. And because reorders skip both the digitizing fee and screen setup, restocking a best seller carries no new setup cost.
Common Mistakes First-Time Designers Make
Most disappointing first orders trace back to the same handful of errors. Avoid these and your first order will look like your fifth.
- Too many colors. A six-color design on a 12-piece run carries six screens of setup. Simplify the palette or switch to DTF.
- Tiny text in thread. A slogan that reads fine at 10 inches on a screen becomes a fuzzy line at 3 inches in stitches.
- Low-resolution art. Logos saved from a website or social profile rarely hold up at full-front size.
- One print size for every shirt size. A 12-inch graphic looks right on an adult large and wraps into the armpits on a youth small.
- Designing on white when the shirt is black. Check your art on the actual garment color; dark fabrics need different color choices.
- Picking the cheapest blank. A thin, scratchy tee gets worn once, which wastes the design and the decoration.
- Skipping the sample. One test piece is the cheapest insurance you can buy.
- Guessing the size mix. Collect sizes before ordering, or run pre-orders, so you aren't left with a pile of XLs.
From a Personalized One-Off to a Branded Clothing Line
Most people start small. A personalized sweatshirt with every grandkid's name. A shirt for a family reunion with the year on the sleeve. A batch of caps for a fishing crew. Each one teaches you how art, fabric and decoration work together, and none of them needs a minimum order.
The next step is usually a small group order: a team, an event or a business. Here the design has to work across sizes and body types, and personalized names or numbers often come into play.
If you want to sell what you design, think in collections rather than single shirts:
- Build a logo system. A primary mark, a simpler secondary mark for caps and sleeves, and a wordmark. Each needs to work in one color.
- Design a tight first drop. Three to five pieces that share a palette and feel like they belong together.
- Test before you scale. Small runs and pre-orders tell you which sizes, colors and designs people actually buy.
- Plan the finishing details. Retail buyers expect size and care information, and US rules require fiber content, country of origin and care instructions on most apparel.
- Reorder the winners. Reorders of the same design skip the digitizing and screen setup fees, and your art is already approved, so restocking a best seller is simpler than launching something new.
When you're ready to treat it as a business, read our step-by-step guide to turn designs into a clothing brand, covering naming, sampling, pricing and the first launch.
That's how to design clothes without a sewing machine: define the problem, build a board, prepare clean art, choose the right blank and method, approve a mockup and test with one piece. Every branded line and every personalized gift starts the same way.
Frequently Asked Questions
How do I design my own clothes as a beginner?
Start with the decorated-blank route. Write down who the piece is for and where it'll be worn, build a mood board, and sketch on a flat template of the garment. Turn the sketch into clean artwork, ideally a vector file, choose a blank and decoration method, then design it live in our 3D Custom Designer. Order a single sample in your size before you commit to a larger run.
Can I design clothes without sewing?
Yes. Decorating a ready-made blank needs no sewing at all. You design the artwork and choose the garment, placement and method, whether that's embroidery, screen printing, DTF, DTG, sublimation or a patch, and the decorator handles production. Sewing only becomes necessary when you want to create a new garment shape, which is the cut-and-sew path.
What software do you need to design clothing?
For artwork on apparel, a vector editor is the most useful tool: Adobe Illustrator, Affinity Designer or the free Inkscape. Procreate, Photoshop or GIMP suit photos and painted art. Pattern software such as CLO 3D or Valentina is only needed for cut-and-sew. You don't need any of it to start, since a clear sketch is enough to upload to our 3D Custom Designer.
How do I make custom clothes at home?
At home, most people use iron-on vinyl, fabric paint or hand embroidery. Those work well for one-off projects, though home heat presses and paints rarely match the wash durability of production embroidery or professional printing. A practical middle path is to design at home, then send the artwork to a decorator so the piece lasts through years of washing.
How much does it cost to design your own clothes?
The design itself can cost nothing if you use free software. Production cost depends on the garment, decoration method, colors or stitch count, placements and quantity, and garment prices are listed on each product page. Setup is a one-time $35 digitizing fee for embroidery and nothing for DTF; screen-print setup is quoted with orders of 100+ pieces, and reorders of the same design skip setup fees. There's no minimum, so you can start with one piece.
Do I need a fashion design degree to design clothes?
No. Designing artwork for apparel takes an idea, some practice with design software and an understanding of how files, fabric and decoration methods behave, all of which you can learn on your own. Cut-and-sew design has a steeper learning curve, but pattern making and sewing are teachable skills, and plenty of designers start without formal training.
Is there a website where I can design my own clothes?
Yes. Design it live in our 3D Custom Designer: upload your logo or artwork, choose the garment, color and placement, and preview it before anything is produced. For 100+ pieces, request a bulk quote and get a free mockup from our team. If you only have a rough idea, include a sketch or a short description with your request.

Your brand. Beautifully made.
See your design live in 3D
Upload a logo or add text and see it on the garment instantly. No minimums. Ordering 100+ pieces? Get a bulk quote.